Friday, July 22, 2011

Lesson learned... the easy way

Yesterday I finally got started on planting the Boxwoods. After deciding about where I wanted them planted, I started digging. My intention was to plant them one by one. This would have been a mistake had I not started with the one that I did. When I started digging, I quickly found that the placement was right next to one of the in-ground sprinkler heads. This particular head is not in a good spot and needs to be moved about a foot or so closer to the grass (a project for another day, or for another person to do for me!), but I didn't want to plant it right next to it knowing that the area will have to be dug up in the future in order to move the head.

Sprinkler head in a bad place.

So, not sure what to do about that, I moved over to the next bush, started digging, then ran into a large root of the nearby tree. I thought to myself, "wow, this is going well."

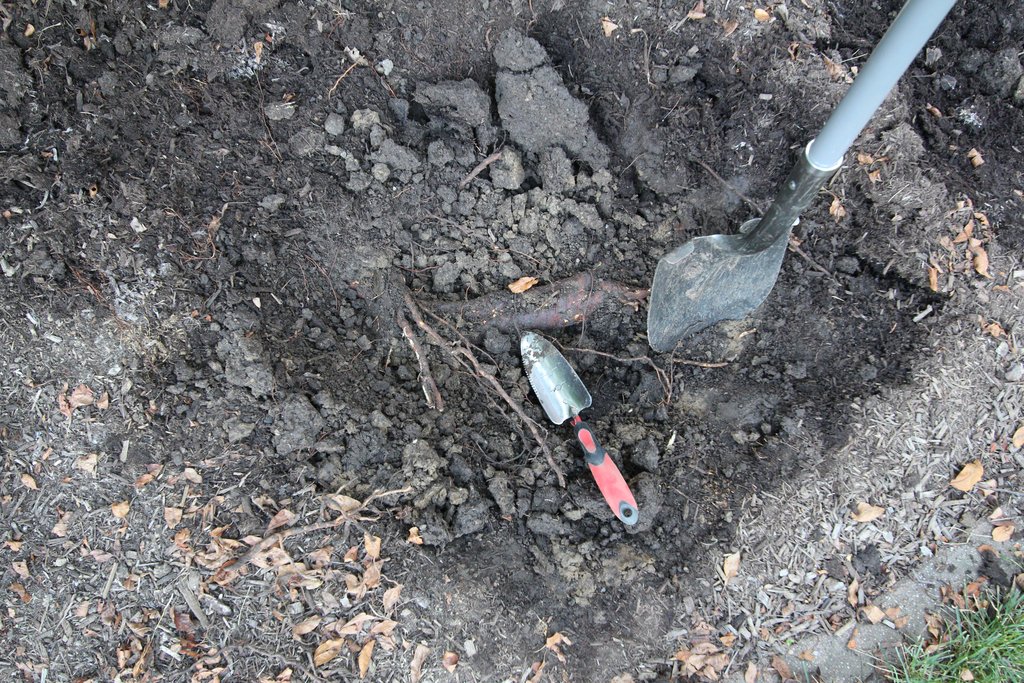
A large root right where I wanted to plant.
I thought about going to get the ax, but thought that the tree may not like that so much, and started exploring other options such as planting it on either side, which required adjustments all of the other plants to maintain equal distance between them.

And this was the lesson I learned: dig all of the holes first before planting. Had I started at the other end, I probably would have planted 3 bushes before encountering this problem. Then I would have had to dig them up to fix the spacing. So, I'm very fortunate to have run into the problems when I did!

So because of the root I had two options (aside from using the ax): 1) plant it about 3 or 4 inches to the left and just in front of the root, or 2) plant it about a foot to the right. Adjusting the other plants accordingly in both cases.

I slept on it, and in the end I decided to plant it slightly to the left and just in front of the root. The Boxwood roots are just an inch two or so from the tree root, so hopefully this doesn't cause problems and the two plants can peacefully share the water and nutrients. The reason I went that way was purely aesthetics as I didn't like how it looked as much being so far to the right.

Tonight I finally planted them, digging all of the holes prior to planting. Doing this also allowed me to place each plant more precisely relative to the others. I planted them following the same instructions as I followed when planting the Holly bushes. Here is how they ended up looking:

Newly planted Boxwoods.

All together now.

Green Velvet Boxwood tag

I'm happy with it. It looks way better than how it looked with them sitting there unplanted in their pots. I think it'll be nice having some color there come winter.

Next up, I plan on planting some flowers in front of the Holly bushes. I still like the idea of having Sedum "Autumn Joy" there, so that's the plan.

Blue Hollies planted

Last weekend I planted the Blue Holly bushes (yes, I am behind!):

Blue Holly bushes planted

I really struggled with the placement if them as I wanted to block as much of the irrigation valves as possible, but also I wanted it to look orderly. It seemed like the bushes should line up with the window, so that's what I ended up doing (approximately) and I'm hoping that the bushes will grow and fill in more. They still seem kinda crammed in there, but it works for me.

I followed the instructions given by the nursery for planting them. In a nutshell they are:

  1. Dig a hole 2-3 times the width and no deeper than the root ball with the edges sloping downward
  2. Remove any girdling roots, which are roots that circle the plant instead of spreading out radially from the plant (these can eventually choke the plant)
  3. Create a mixture of 2/3 original soil and 1/3 peat moss
  4. Place the plant in the center and fill in with the soil
  5. Use water to settle the soil around the plant
  6. Mulch 2-4 inches with hardwood bark mulch
  7. Water thoroughly

I didn't end up mixing in the ammonium sulfate with the soil, but I did mix in peat humus and topsoil like I did with the Hydrangeas.

They are still alive after one week, so that's good. With the heat and drought conditions that we've had lately, I've watered them a few times with the hose on a trickle at the base of the plant.

Saturday, July 16, 2011

Rose slugs are back

Anger.

I sprayed them with Insecticidal soap again.
That is all.

Here goes nothing

Today I purchased some shrubs in continuation of our landscaping project. Three Blue Holly's for under the window and five Boxwood 'Green Velvet's for under the tree. I have decided to go out on my own and do a hybrid of the two designs. The first design had seven boxwoods under the tree and in a line toward the window, and the second had eight hostas under the tree and the three Blue Holly's under the window. I think it's a good compromise, but good design? I don't know, but this is our home and we are going to be the ones seeing it the most, so ultimately what matters is that we like it - that's how I see it anyway. My plan is to put Sedum 'Autumn Joy' in front of the holly bushes as per the second design, but beyond that the rest of the design still has yet to be finalized.

I dug up the Gayfeather and Astilbe that I planted under the tree last year (but I'm not sure where their new home will be). Then I put all of the new shrubs in their relative places to get an idea of how it will look. I have not planted them yet (that is my plan for tomorrow). Here's a shot of the Blue Holly bushes:

New Blue Holly bushes, unplanted.
Blue Holly is an interesting plant in that there are male (Blue Prince Holly) and female (Blue Princess Holly) plants and the female will only produce berries when a male is in the vicinity. The technical term for this is dioecious. I think that is fascinating. So, of course, I had to buy one of each, despite the prince not being as thick (which is apparently just how it is according to the nursery). I purchased two Princesses and one Prince; in the photo the prince is on the right. I'm hoping that those will grow and fill in the area so that the irrigation valves won't be as visible. I also purchased some ammonium sulfate to mix in the soil since they prefer the soil to be acidic (I'll use this on the Boxwoods as well, and I plan to use it to try to turn the Hydrangeas blossoms blue - can't wait to see that!). I paid full price at the nursery to get the hollys, but not so with the Boxwoods:

Fix unplanted boxwoods.
I found the Boxwoods on sale at Lowes for $10 each (which is nearly 1/5 of the cost of the nursery!). Like the Hydrangeas, I just couldn't pass that up even though I'm sure the nursery has provided much better care of them. They looked good enough to me, though.

Here's another angle of it all:


It's starting to come together (very sloooowly...)!

Thursday, July 14, 2011

Planning

It's time to start planning - no, not for our landscaping project (although, those plans have also yet to be finalized), but for grass planting. The optimal seeding window for central Indiana of August 15 - September 15 is quickly approaching. According to the Establishing Lawn Areas From Seed publication by Purdue University and University of Illinois:
It is critical to seed as early as possible within these windows. Even when seeding within these windows, waiting one week to seed may mean the stand will take 2 to 4 additional weeks to mature.
I put that to the test last year, but not this year (I hope)!

The Lawn Improvement Programs publication (also by Purdue University and University of Illinois) states that August 15 - September 1 is the optimum time to plant cool-season grasses (hm... conflicting information?). In any case, I plan to hit the early side of the window. This publication is the one I will likely be following as the other one focuses more on new seedbeds (don't want to do that again), while this one focuses on existing lawns and includes directions for both overseeding and reseeding.

First off, I've got a little secret to tell. For the past few weeks I've been pulling up undesirable grass by hand... Yes, I'm going crazy again. Just every couple of days for an hour or two at a time - nothing too crazy... no, not crazy at all... nope. Yesterday, one our neighbors walked by as I was out pulling and started talking to me. I told them that I enjoyed working in the yard and that it's kind of a hobby, to which they replied (and I quote) "A hobby?? More like an obsession!" I guess people notice more than I think! They must think I'm crazy... Oh well, I think everyone's crazy, just in different ways. There, I feel better now.

Now, back to business. I think I've made some good progress. Here's a look:

This side is nearly 100% tall fescue free

My new yard work buddy!
I'm slowly making my way this way.
It's looking a lot more uniform as a whole now and aside from the patchiness, I'd say it looks much improved over earlier this year. The Certainty herbicide I applied seems to have greatly weakened the patches of tall fescue, making them much easier to pull (which is the main reason I've even tried), but what I have found is that if I don't get the whole plant root, it grows right back... I'm continually amazed at how resilient it is.

So, as far as seeding goes, I have two options: overseeding or reseeding. Overseeding means planting seeds over the existing grass, and reseeding (as I'll define it) is killing the grass and completely reseeding. I'm really torn between the two. On the one hand, reseeding would result in a nice fresh stand of pure tall fescue-free grass, similar to last years reseeding, with the downsides of 1) the lawn not looking good for the end of summer into early fall, 2) the risk of two different color tones of grass between the new and existing grass, and 3) the grass not growing well due to the soil being too compact because I absolutely will not till it like I did last year. On the other hand, overseeding won't make the lawn look bad and likely won't result in an obvious edge between different areas of the lawn, with the downsides of 1) it may not look great mixed with the existing grass (could look patchy if colors are different), 2) I'll have to continue fighting with the tall fescue, and 3) I haven't had much success overseeding.

My general thinking at this point is that I'll overseed the areas that are free of tall fescue and reseed the areas that are still in large part either mostly dead and patchy or still has high concentration of tall fescue.

For the areas that I'm going to kill first, I'll need to give an extra week or so for the grass to die. In addition, I need to make plans to 1) purchase seed, and 2) look into either renting a aerator or finding a company do it for me. All this to say, this project begins in less than a month!

Sunday, July 10, 2011

Landscaping progress

This weekend I continued work on our little landscape redo. With the hydrangeas planted, I was thinking that I would rip out the overgrown bush in front of the window and possibly plant some blue holly bushes. I didn't quite get to the bush purchasing/planting, however, I did rip out the existing bushes, making for a very clean slate look to our landscape.

Old bushes removed
Here's a shot that shows what it looked like earlier this year:

Before: a view from May of this year
At the time I was considering removing these very bushes.

After that I teetered on going out to purchase the holly bushes as per the design, however, I decided to hold off for now as I'm just not sure about the holly bush idea. The biggest concern I have is the limited space in the area because Blue Holly bushes can grow to over 10 feet tall (if not pruned)! An about.com page on the bush states:
"While it's possible for Blue Princess and Blue Prince holly to top 12' in height at maturity, these shrubs, even with just minimal pruning, are easily kept at a fraction of that height."
So perhaps that fact isn't too big of a deal, but also while browsing at the store one day I noticed that it said to plant them at least 5 feet apart! There is no way I could do that - 3 feet at most, maybe. This random Q&A posting also confirms my fear:
"I planted a blue holly several years ago and now realize that it is too big for the location. I don't want to spend the rest of my days severely pruning this plant back, just to keep it inbounds."
I think I may ask the designer to see what he has to say about this.

So, I decided to move on to something else instead, but I wasn't sure what. The design isn't quite final in my mind, particularly for the front of the house, so I have been struggling with trying to get it to a more finalized state. I decided that it would be helpful for my very visual-aided brain to have the brick edging in place, so I went to work on that and ended up with this:

Brick edging in place
Unfortunately, I was so exhausted from doing this that I never went back to see if that actually helped me visualize anything. I'll have to save that for another day.

Wednesday, July 6, 2011

Lawn Fertilized

Yesterday I fertilized the front lawn. According to the Purdue Turfgrass Science Program's Maintenance Calendar for Indiana Lawns, it says under July:
Apply 0.75 lbs. N/1000 ft2.
Fertilize only on irrigated lawns or during summers with above average rainfall and use a product containing slow release N.
I have noticed that the grass has seemed to be yellowing a bit and had more dead blades than usual. We have a had much above average rainfall this spring and summer with over 21" since April with the normal for this period being a little over 12".

I did some shopping around for fertilizer with a good amount of slow release N and finally found a  product with a substantial amount of slow release nitrogen (almost all, in fact):

Endure Premium Lawn Food Plus
24-0-3
22.5% Urea Nitrogen (22.5% stabilized/slow release)
0.15% Ammoniacal Nitrogen (quick release)
1.35% Water Insoluble Nitrogen (slow release)
3% Potash
This is the same brand as the crabgrass preventer I used earlier this year.

I applied roughly 1/4 of the bag, or 5 lbs over the front yard (approximately 1600 sq ft) which equates to roughly .75 lbs N/1000 ft2. This fertilization calculator comes in handy for figuring the desired amount apply. I used a Scotts Edgeguard Mini to apply it and used the lowest setting (2) and made roughly 3 passes across the lawn about 3-5 feet apart going in different directions each time.

Then this morning I irrigated for 25 minutes.

The lawn looks noticeably greener today (probably more due to the watering), but I presume will continue to look better, especially if we get more rain. I don't plan on watering again unless we don't get much rain for an extended period.

Monday, July 4, 2011

Other new plants

In addition to the new Hydrangea bushes, I also purchased some other plants this weekend. First, some Caladiums for the backyard which I put in a pot:

Caladiums in a pot
I bought one of each kind they sold (three in total). I like them all!

I also purchased two more Japanese Painted Ferns to pair with one that I purchased earlier this year and planted them with it in the backyard next to the porch:

Japanese Painted Ferns
And finally, I purchased a Autumn Fern which I thought I would have a place for next to some other ferns, but it turns out not so much, so I'll I have to find a spot for it.

Autumn Fern
I like ferns.

It begins

This weekend I started work on redoing the landscaping in the front yard after getting two designs (well, really just one with a second opinion). I started with what I was most confident in: the hydrangeas. I began by ripping up the existing bushes, then went shopping for 3 more "Endless Summer" Hydrangea plants. I ended up buying them from Home Depot instead of a local nursery to save money - they were 3 times as much at the nursery (granted they were larger, but still) - I hope I don't regret that. The only problem was that they didn't have any blue-colored ones for some reason, but I bought them anyway knowing that the colors are dependent on the acidity of the soil and can always be adjusted (in theory). This is how it ended up:

Newly planted hydrangeas.


I also purchased some bags of peat humus and top soil to plant them with:

Peat Humus and Top Soil
I think they look pretty good and will look even better once they grow larger, I hope.

I think next I'll remove the overgrown bushes in front of the window and plant holly bushes. I think....

Free of bristly rose slugs

After one application of insecticidal soap and a couple of spot sprays in the following days, I haven't seen a single rose slug since. There are also many new leafs now none of which have been munched on. I'm going to call this a victory!